Targeted audience:
Users who have been playing Core Keeper locally and want to move to a dedicated server. This requires some technical knowledge to install a new operating system and manage your network.
Prerequisites:
- A server or virtual machine
- 2+ CPU cores
- 4 GB Memory
- 40 GB Storage space
- A physical network connection (Ethernet)

Summary:
In this article, we’ll install a new Ubuntu server, install Docker, pull a Core Keeper image, and move existing Core Keeper data from an old local save to the new dedicated server.
How To:
1. Download the latest Ubuntu 22.04 LTS (Long term support) image from here: https://ubuntu.com/download/server. This should download a new ISO file to your local machine.
2. If you’re using a physical machine, use a tool like Rufus (https://rufus.ie/en/) to build a USB image with the new Ubuntu file. If you’re using a VM, copy the ISO file to your virtualization server and create a new VM based on that image.
3. The installation of Ubuntu is mostly a click through process, but if you’re new, there are two pages that should be manually configured:
Help Configuring Ubuntu Network during Install
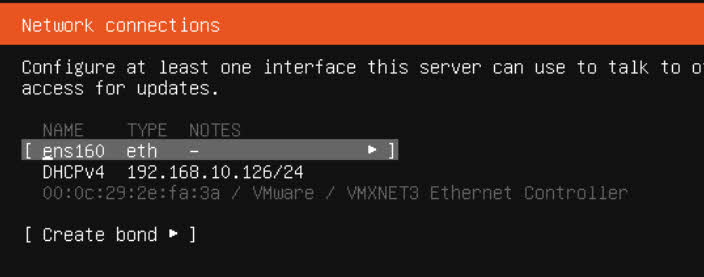
- On the "Network connections" page, set a static IP address. Navigate to the name (likely "ens-something") and press Enter.
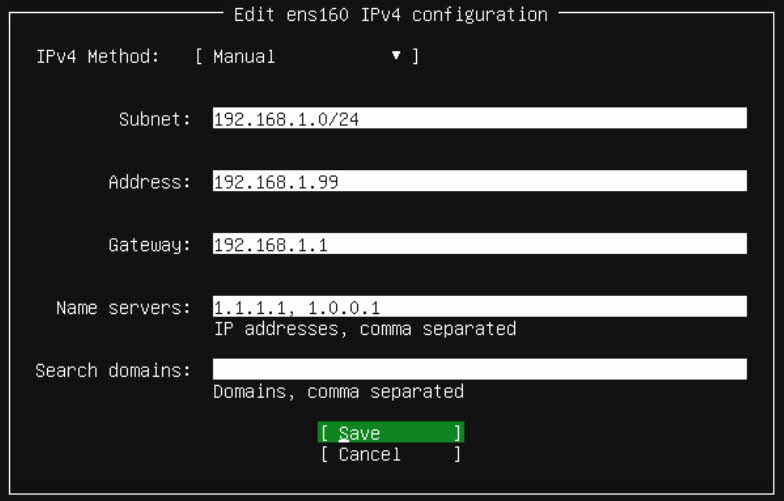
- Select "Edit IPv4"
- Change "Automatic (DHCP)" to "Manual"
- Enter your network details:
- The "Address" is the static IP you want to assign. No special CIDR notation needed this time!
- The gateway is likely your router. For most people, that will be 192.168.0.1 or 192.168.1.1.
- The "Name servers" are your DNS servers. Configure your own or use Cloudflare if you're unsure, just enter: "1.1.1.1, 1.0.0.1" (without the quotes)
- Most people can ignore "Search Domains"
The "Subnet" is in CIDR notation. If you're used to typing 255.255.255.0 for the subnet or netmask, this will be a little different. Instead, type the first 3 octets of your IP address range, followed by ".0/24". That means for most people, it will be "192.168.0.0/24" or "192.168.1.0/24". If you're not sure, look at your machine's current IP address. Is it 192.168.0.X or 192.168.1.X or something else? Everyone's network is a little different, so.. YMMV! In the above screenshot, mine would be 192.168.10.0/24
Example Completed "Network Connections" page:
Help Configuring Ubuntu Hard Drive during Install
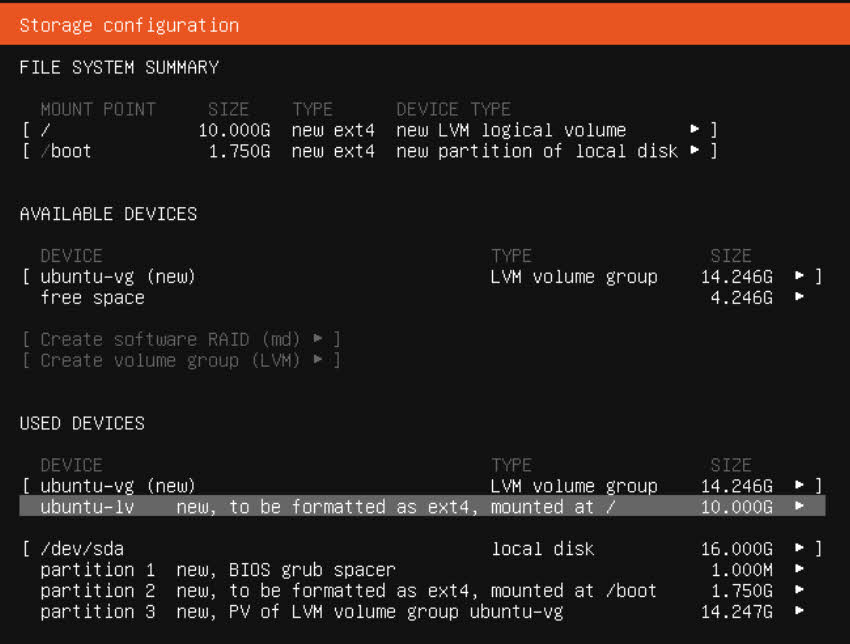
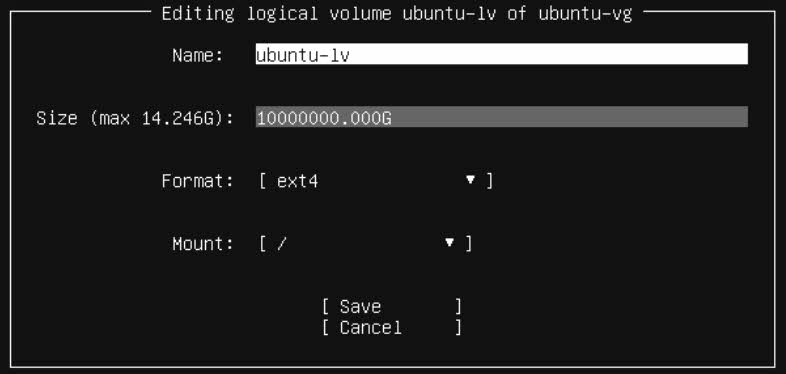
Ubuntu server by default will not use all of the hard drive that you allocate to it. There are reasons for this, but for this simple tutorial, we’re not going to be using those advanced features. To use your whole hard drive, follow these quick steps:
- On the "Storage Configuration" page, navigate to "ubuntu-lv" under "USED DEVICES" and press Enter
- Go to Edit
- Under "Size" see that the max size is bigger than what Ubuntu uses? Let's up that. Simply change that number to something much larger and press Tab. The installer will automatically set it to the max size.
- Leave the rest of the settings alone and click "Save"
Example Completed "Network Connections" page:
4. Finally! Finish up the Ubuntu install by clicking through the rest of the setup. At the end when asked to setup OpenSSH server, I recommend checking the box.
5. If you installed Ubuntu and setup the network correctly, you can now SSH to the server using a tool like PuTTY (https://www.chiark.greenend.org.uk/~sgtatham/putty/latest.html). Hope you remember your username and password! Once you're logged in with SSH, continue on..
6. First things first, update. Run this command. If Ubuntu asks you to restart services with a pink background, just click <Tab> and :
sudo apt update && sudo apt upgrade -y7. Next, let's install docker. I recommend getting the latest version by following the instruction here: https://docs.docker.com/engine/install/ubuntu/. You should follow the steps under "Install using the repository", but if you're lazy and trust the Docker folks, you can download the automated script: https://docs.docker.com/engine/install/ubuntu/#install-using-the-convenience-script.
8. With Docker installed, let's create a location for our game. Use this command to create a new directory:
sudo mkdir /srv/core-keeper-dedicated9. Now let's hop into that new directory:
cd /srv/core-keeper-dedicated10. For this tutorial, we'll use this Docker image: https://hub.docker.com/r/escaping/core-keeper-dedicated. Let's pull it down:
sudo docker pull escaping/core-keeper-dedicated11. According to the image's owner, we need to create two files. Let's create those with nano, a simple text editor.
- Run this to create the new file:
sudo nano docker-compose.yaml- Copy this content and then use right-click to paste into the docker-compose.yaml file:
version: "3"

services:
  core-keeper:
    image: escaping/core-keeper-dedicated
    container_name: core-keeper-1
    volumes:
      - ./server-files:/home/steam/core-keeper-dedicated
      - ./server-data:/home/steam/core-keeper-data
      - /tmp/.X11-unix:/tmp/.X11-unix
    env_file:
      - ./core.env
    restart: always
stop_grace_period: 2m- Use <Ctrl> + X to save the file. Press "Y" to Save your changes, and press <Enter> to keep the same name, docker-compose.yaml
- Let's create the next file. Same as before:
sudo nano core.env- Copy this text and use right-click to paste it into the file:
WORLD_INDEX=0
WORLD_NAME=Core Keeper Server
WORLD_SEED=0
GAME_ID=
#DATA_PATH=
MAX_PLAYERS=10
DISCORD=0
#DISCORD_HOOK=https://discord.com/api/webhooks/{id}/{token}- We're leaving the GAME_ID blank for now, so a new one will be created. Also, we're not using Discord integration. Again, press <Ctrl> + X to save the file and follow the prompts as before.
- Finally, let's create two new folders to store our data:
sudo mkdir server-data server-files12. GREAT! Let's start up our server for the first time!
sudo docker compose up -d13. Wait for just a minute, and then run:
sudo docker exec -it core-keeper-1 cat core-keeper-dedicated/GameID.txt && echo -e "\n"14. The server will spit out your customized random GAME_ID, something like: VZdWFlZ24LJuVizKlgh1ZsQbbXKT. Copy that text by highlighting it (Putty will auto copy things that are high-lighted, isn't that nice!). To save the ID permanently, first stop the container:
sudo docker container kill core-keeper-115. Now we modify the core.env file:
sudo nano core.env16. Paste your unique game id immediately after the "GAME_ID=" config:
GAME_ID=VZdWFlZ24LJuVizKlgh1ZsQbbXKT
17. Again, <Ctrl> + X to exit.
18. Let's restart Core Keeper:
sudo docker compose up -d19. Wait a minute and then check if it's running correctly. You should see the same Game ID at the very bottom:
sudo docker container logs core-keeper-120. Let's test that we can connect! Load up Core Keeper on your machine. On the Main Menu, select Join Game and paste your unique GAME_ID value that we set. Hit Join and wait for it to connect.
21. If you successfully connected, go ahead and quit Core Keeper. We want to move our previous world over now. Open up a new File Explorer window and go to "%USERPROFILE%\AppData\LocalLow\Pugstorm\Core Keeper\Steam". Each numbered folder is a different world. Choose the world you'd like to move and enter the folder. Copy these files somewhere you can find them, like your Desktop:
- Admins.json
- ServerConfig.json
- ServerConfig.json.pugbackup
- worlds (the whole folder and everything inside)
22. We need a tool to copy this data to your server. I recommend the portable executable version of WinSCP: (https://winscp.net/eng/downloads.php). Use the "Portable Executable" version. Download it, run it, and click New Site. Enter the details of your Core Keeper server. This will use the same SSH username and password as before.
23. Once you're logged in, the right side of the screen represents your Core Keeper server and the location should be /home/<yourUserName>/. Drag and drop the 3 files plus the worlds folder from your Desktop to this location. They should be copied over to the server.
22. Hop back on your server using PuTTY. If you're not already there, make sure you go back to the Core Keeper directory and let's stop the Core Keeper server temporarily:
cd /srv/core-keeper-dedicated
sudo docker container kill core-keeper-1
23. First backup the old files with these commands:
mkdir ~/core-keeper-backup
sudo mv /srv/core-keeper-dedicated/server-data/* ~/core-keeper-backup/
24. Now let's copy our old save files. If you saved them directly to your home folder when using WinSCP, this command should work:
sudo cp ~/Admins.json ~/ServerConfig.json ~/ServerConfig.json.pugbackup ~/worlds /srv/core-keeper-dedicated/server-data/25. Go ahead and check the folder to make sure the files were correctly copied over:
sudo ls -al /srv/core-keeper-dedicated/server-data/You should see something like this:
$ ls -al server-data/
total 24
drwxrwxr-x 3 user user 4096 Nov 11 06:35 .
drwxr-xr-x 5 user user 4096 Nov 11 07:45 ..
-rw-rw-r-- 1 user user 315 Nov 11 06:06 Admins.json
-rw-r--r-- 1 user user 210 Nov 11 06:35 ServerConfig.json
-rw-r--r-- 1 user user 210 Nov 11 06:35 ServerConfig.json.pugbackup
drwxrwxr-x 2 user user 4096 Nov 11 06:22 worlds
26. If you see similar, go ahead and start your server again:
cd /srv/core-keeper-dedicated/
sudo docker compose up -d
27. Wait a minute, and then check the logs with:
sudo docker container logs core-keeper-1If you see your Game ID at the bottom and no noticeable errors, open Core Keeper and try to login. Once again, use "Join Game" and the Game ID is the ID in the log above.
Conclusion:
These steps should allow you to setup your own Core Keeper server. You will be able to share the connection locally with any users on your network. If you want to share with users outside your network, you may need to consult other guides on configuring your network/firewall.