Background
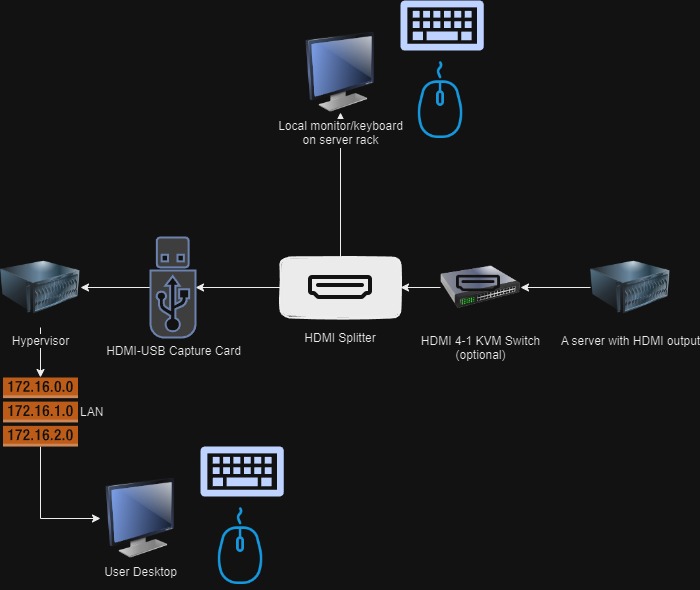
My server rack already has a hardwired keyboard and 4 port KVM attached, but I wanted to be able to quickly view my server’s console over the network. Solutions for this type of device exist, but they can be several hundred dollars, especially while Raspberry Pis are in such high demand. I have several hypervisors just sitting around with available resources, why can’t one of them show me the remote screen? I had difficulty finding an existing (cheap) tool for this task, so instead I designed my own.
Hardware
To complete this project, you will need some hardware, however it is considerably cheaper than what a Pi-KVM would cost you.
- HDMI to USB Capture Card ~$20
- I used a cheap solution from Amazon, but many will work, likely including PCI-e if you have one already. https://www.amazon.com/gp/product/B0C5VVD89N
- (Optional) HDMI Splitter ~$15
- Since I already had a local monitor on my server rack, I picked up a cheap HDMI splitter to split the output from the KVM switch to my local monitor and also to the capture card. Again, any HDMI switch will work; I used this one: https://www.amazon.com/gp/product/B0BXWZNQGD
- A hypervisor with a free USB port
Hardware
Software
My hypervisor is ESXi, but this should work in any hypervisor in which you can add a local USB device to a VM.
Download Ubuntu Desktop
You will need a Linux environment with a Desktop environment. I tried installing Ubuntu Server and adding the X components, but it wouldn’t recognize the USB capture card correctly when I did this. You could also try using any other Linux distro with a desktop environment. In my case, I went with Ubuntu 22.04 LTS: https://ubuntu.com/download/desktop
Create a new VM
In your Hypervisor, create a new VM. I’ve experimented with settings, and this seemed to be adequate for my stream needs:
- 2 vCPU
- 4 GB Memory
- 30 GB HDD
- Video Card:
- 1 display
- Video memory: 64 MB
- 3D Graphics: Disabled
- 3D Renderer: Automatic
- USB Device: USB Capture Card (called “MACROSILICON USB3 VIDEO”)
Install Ubuntu Desktop as you normally would.
Installing Software
Once you have Ubuntu up and running, you can connect via SSH or open a Terminal via your hypervisor’s Console.
First things first, update your packages:
sudo apt update && sudo apt upgrade -yInstall ustreamer (https://github.com/pikvm/ustreamer):
sudo apt install ustreamerIf you want a firewall enabled, allow TCP/8080, (optionally TCP/22), and enable UFW:
# Allow TCP/8080 for the stream
sudo ufw allow 8080/tcp
# Optional - Allow TCP/22 for SSH
sudo ufw allow ssh
# Start UFW firewall and enable it for system startup
sudo ufw enable
Test ustreamer is functional:
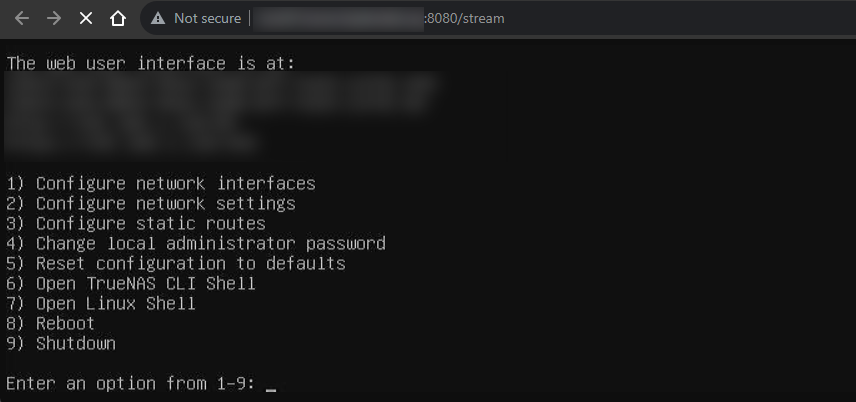
sudo ustreamer --host=0.0.0.0 --port=8080 --persistent --tcp-nodelay --quality=60 --resolution=1280x720 --slowdown --desired-fps 10The console should now be in-use as it runs ustreamer. On a separate machine, try to connect to http://yourVmIpAddress:8080/stream. You should see the video output of whatever is connected to your HDMI Capture card. Example: My TrueNAS physical server’s output
Feel free to play around and tweak the configuration options for ustreamer. For example, if you gave your system more resources, you might be able to bump up the resolution or fps. In my situation, the above settings are the perfect middle ground between quick refreshes and not taxing my system resources. When connected to my stream, the VM only utilizes about 14% of the allocated resources. When I used higher resolution or more fps, ustreamer often took 100% of system resources.
Running ustreamer as a service
In order to run ustreamer automatically when the VM boots up, you should run it as a service. Below, I have configured the system to allow multiple instances of ustreamer if desired (would require additional capture cards).
First thing.. If you still have ustreamer running, stop it with Ctrl + C.
Now, add a ustreamer user so you don’t need to run this as root.
sudo useradd -r ustreamerCreate a video group for ustreamer
sudo usermod -a -G video ustreamerCreate the service file:
sudo nano /etc/systemd/system/[email protected]In this file, paste the following. If you tweaked your ustreamer settings, modify them here.
[Unit]
Description=uStreamer service
After=network.target
[Service]
Environment="SCRIPT_ARGS=%I"
User=ustreamer
ExecStart=/usr/bin/ustreamer --process-name-prefix ustreamer-%I --log-level 0 --device /dev/video%I --device-timeout=8  --quality 60 --resolution 1280x720 --desired-fps=10 --slowdown --host=0.0.0.0 --port=808%I --static /var/www/html/ustreamer-%I/
[Install]
WantedBy=multi-user.target
What’s happening:
- Description: Creating a service called uStreamer service
- After: It will start after the network has come up
- Environment: The service will take an input (a number) to denote which ustreamer service we’re running and which corresponding port it will use.
- User: It will run as ustreamer
- ExecStart: The start command.
- The process will have a prefix with corresponding ustreamer number
- The device we’re using corresponds with the argument passed. The USB device will either be mounted to /dev/video0 or /dev/video1. Mine is always /dev/video0.
- Quality: set the quality level of ustreamer
- Resolution: set your desired resolution
- FPS: set your desired FPS. Remember.. this isn’t a video game, 10 FPS is plenty for text based tools. You can increase this if you think you’ll be controlling the system remotely via mouse.
- Host: ustreamer will listen on all network interfaces
- Port: 808%I means we will listen on 8080 when you pass “0” as the argument later.
Save the file. Test the service startup by running:
sudo systemctl start [email protected]Try to connect to your server on port 8080 again. If for some reason your VM mounted the USB Capture Card to /dev/video1, then your command would use “[email protected]” instead.
If everything worked, then enable your service to start on boot:
sudo systemctl enable [email protected]Conclusion
And that’s it!
If you have a HDMI KVM switch like I’m using, then you can plug in a wireless mouse/keyboard combo to the KVM switch, and you’ll be able to control the server wirelessly (assuming you’re in wireless range of the server).
So far, I’ve been able to update my servers’ UEFI and resolve network problems when the server wouldn’t boot correctly.
Possible Improvements
There are two improvements that I will look into in the future.
It might be possible to send commands from the VM/hypervisor to the server. Pi-KVM and other systems do this using a USB to UART controller. It might also be possible to use a “USB On-The-Go” cable.
You could put ustreamer behind nginx to enable SSL. This should be trivial, and has been documented by the ustreamer devs: https://github.com/pikvm/ustreamer#nginx