Intended Audience
- Users who have purchased/received a LubanCat Single Board Computer (SBC) and are having difficulty following the documentation in Chinese
Summary
Available on Amazon, AliExpress, and other sites are relatively cheap SBCs with strong performance numbers under the manufacturer, “LubanCat”. These are Rockchip ARM SoCs and are typically similar shape to the Raspberry Pi alternatives. I received one of these SBCs (the LubanCat Zero W) as a gift and wanted to document my experience for others who may be struggling with the all-Chinese documentation.
The pre-compiled system images by the developers are out of date and are hosted on Baidu, a Chinese filesharing site that requires a Chinese phone number and payment to use. In this guide, we will compile our own Ubuntu 20.04 LTS image using the LubanCat SDK, which uses tools from Google (git-repo), GitHub, to modify an image downloaded from Ubuntu’s site. The source of the documentation I’m using is located here: https://doc.embedfire.com/linux/rk356x/build_and_deploy/zh/latest/building_image/lubancat_sdk/lubancat_sdk.html
NOTE: I cannot recommend purchasing these devices due to the poor documentation and possibility of security vulnerabilities. In my situation, all devices touching this software, including the physical board, are isolated on a guest network. I am only documenting this information for others who perhaps were gifted a device as I was and can properly isolate it on a secure network.
Prerequisites
- An Ubuntu VM (server or desktop version) running Ubuntu 20.04+ LTS
Building an Ubuntu 20.04 LTS image
Preparing the build machine
- Make note of which SoC is on your board. In my case, the LubanCat Zero W uses the RK3566, but your device may use the 3568 chip, which requires slightly different steps.
- Install the necessary packages on your Ubuntu VM:
sudo apt install git ssh make gcc libssl-dev liblz4-tool u-boot-tools curl expect g++ patchelf chrpath gawk texinfo chrpath diffstat binfmt-support qemu-user-static live-build bison flex fakeroot cmake gcc-multilib g++-multilib unzip device-tree-compiler python3-pip libncurses5-dev python3-pyelftools dpkg-dev python3- For now, install python-is-python3, which tells the system to use Python3 when you type “python”. Google’s git-repo requires Python3. Later build commands will use Python2 though, so you’ll need to toggle between python-is-python2, depending on which application you’re using.
sudo apt install python-is-python3- Install Google’s Git-repo in your user’s home directory:
mkdir ~/bin
curl https://storage.googleapis.com/git-repo-downloads/repo > ~/bin/repo
chmod a+x ~/bin/repo
echo PATH=~/bin:$PATH >> ~/.bashrc
source ~/.bashrc- Test that git-repo is installed correctly. You should get similar to the below:
repo --version

<repo not installed>
repo launcher version 2.32
    (from /home/he/bin/repo)
git 2.25.1
Python 3.8.10 (default, Nov 14 2022, 12:59:47)
[GCC 9.4.0]
OS Linux 5.15.0-60-generic (#66~20.04.1-Ubuntu SMP Wed Jan 25 09:41:30 UTC 2023)
CPU x86_64 (x86_64)
Bug reports: https://bugs.chromium.org/p/gerrit/issues/entry?template=Repo+tool+issue- Create a directory for building the OS image and cloning the Git repos:
mkdir ~/LubanCat_SDK
cd ~/LubanCat_SDK- Configure git for later git pull commands:
git config --global user.name "your name"
git config --global user.email "your mail"
Sync the Repos
- Setup the LubanCat SDK repo for RK3566 boards:
cd ~/LubanCat_SDK

# Pull LubanCat-RK356x Series Linux_SDK
repo init --depth=1 -u https://github.com/LubanCat/manifests.git -b linux -m rk356x_linux_release.xml

.repo/repo/repo sync -c -j4- Setup the LubanCat SDK repo for RK3588 boards:
cd ~/LubanCat_SDK

# Pull LubanCat-RK3588 Series Linux_SDK
repo init --depth=1 -u https://github.com/LubanCat/manifests.git -b linux -m rk3588_linux_release.xml

.repo/repo/repo sync -c -j4
These steps will take some time to download, as they will download several GB of data. If you encounter an error with the sync, use the instructions in the next section.
Fixing Manifest issues
Google’s git-repo uses manifest XML files to manage the Git repos. At the time of writing (Feb 2024) the LubanCat-provided manifest XML points to a commit that is no longer available, therefore causing an error. This has been reported on the LubanCat GitHub (https://github.com/LubanCat/manifests/issues/4) several weeks ago. Check the status of this issue to determine if forking the LubanCat repo is necessary. If the sync command did not produce the below issue, you can skip this section.
If the issue exists, you will receive the following error during the repo sync steps:
$ .repo/repo/repo sync -c -j4
ubuntuerror.GitError: Cannot fetch GitCommandError: 'update-ref -m manifest set to 3f4d03b776349f36d51878ae1bafe174bb6436                                 b8 --no-deref refs/remotes/m/linux 3f4d03b776349f36d51878ae1bafe174bb6436b8^0' on ubuntu failed
stderr: fatal: 3f4d03b776349f36d51878ae1bafe174bb6436b8^0: not a valid SHA1
To resolve the issue, you may need to fork the LubanCat manifest repo to fix the issues (https://github.com/LubanCat/manifests). For the sake of brevity, this guide will not cover how to fork the repo. Once you’ve forked the repo, you’ll need to edit the manifest XML file with the correct commit revision. Follow these steps to get the correct revision:
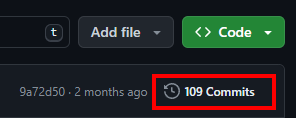
- Go to the LubanCat Ubuntu repo: https://github.com/LubanCat/ubuntu
- Underneath “Code”, locate the “X Commits” button:
- Locate the most recent commit (at the top) and click the “Copy full SHA for …” button:
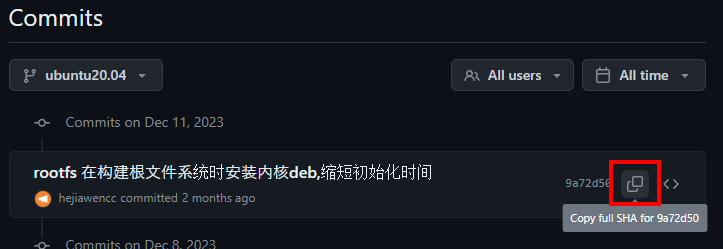
- In your fork, modify the manifest XML corresponding to your board. Locate the ubuntu project tag: <project name=”ubuntu” revision=”ABCD”> and substitute the correct commit SHA you copied into the revision.
- Example: https://github.com/IT-beeric/manifests/blob/linux/rk356x_linux/rk356x_linux_dev.xml
Now, when you issue the “repo init” command from the previous section, substitute your forked repo URL instead. You may need to first abandon the LubanCat manifest repo, which is not described here:
repo init --depth=1 -u https://github.com/IT-beeric/manifests.git -b linux -m rk356x_linux_release.xmlUpdating the repos
To download the latest updates to the repos, follow these steps. These steps will require the python command uses Python3, so if you’ve already proceeded to sections below, you’ll need to install python-is-python3 package again first:
# Enter the .repo/manifests directory
cd ~/LubanCat_SDK/.repo/manifests

# Switch branch to Linux
git checkout linux

# Pull the latest manifests
git pull

#Return to SDK root directory
cd ~/LubanCat_SDK

# Synchronize remote warehouse
.repo/repo/repo sync -c
Building the Ubuntu/Debian image
To build the OS of your choice, follow the steps below.
- Configure SDK to use the desired OS image by selecting from the “lunch menu”:
cd ~/LubanCat_SDK
./build.sh lunch- You will have several build options to choose from
- First, choose your board (RK3566/RK3568)
- Next, choose your distro (Ubuntu/Debian)
- Finally, choose your desktop environment:
- lite: no desktop, terminal version
- xfce: Use the desktop version of the xfce suite
- xfce-full: Desktop version using xfce suite + more recommended packages
Now that you’ve chosen your distro, you’ll need to install the OS prereq packages. Expect a dependency error in the below commands. For Ubuntu builders, use:
# Install Ubuntu packages - you will get errors
sudo dpkg -i ubuntu/ubuntu-build-service/packages/*

# Resolve package dependencies
sudo apt install -f
For Debian builders:
# Install Debian packages - you will get errors
sudo dpkg -i debian/ubuntu-build-service/packages/*

# Resolve package dependencies
sudo apt install -f
Your system will now be using Python2 when you use the command “python”. The Google git-repo will no longer work, so if you need to use it again, you’ll need to switch back to Python3 by installing python-is-python3. Alternatively, you could try installing more recent versions of the included packages using default apt repos.
Finally, to build the OS image, you just need to run:
./build.shThe Ubuntu/Debian image will be built and once complete, a file called “update.img” should be present in the rockdev directory (~/LubanCat_SDK/rockdev/update.img).
Burning to SD
My LubanCat SBC uses an SD card for storage. If your board uses eMMC, a different burning process is required. Translate the information on this page for instructions: https://doc.embedfire.com/linux/rk356x/build_and_deploy/zh/latest/building_image/install_image/install_image_to_emmc.html
According to the documentation, the SD card burn process requires a Windows tool from RockChip called “SDDiskTool”. Reliable download links are difficult to find. I would recommend trying this repo: https://github.com/CmST0us/tspi-linux-sdk/tree/main/tools/windows
Copy the file named update.img to your Windows machine, run the SDDiskTool software and follow the instructions to burn the image:

My first attempt failed with an unknown error in Chinese, but the second attempt succeeded without making any changes.
Once complete, eject the SD card, insert it into your SBC, plug in the HDMI cable first, then plug in the system to power it on.